Starting out on Mars
By Carl Ritson & Jon Simpson (J.Simpson@kent.ac.uk)
Updated: November 30, 2010.
This document provides support for working with the 'Life on Mars' assignment, getting started and working with the simulation and framework code provided. Please check the 'updated' date above, as it's fairly likely this document will be revised as I receive feedback.
If you have a question that isn't covered here, or need additional clarification on any point please e-mail me using the address above.
Contents:
- Getting Started
- Working with the simulator
- The robot.control process
- Tips for Task 1
- Tips for Task 2
- Tips for Task 3
- Resources
- Further Problems
Getting Started
The task description (PDF) sets the scene and details the tasks to be solved. You will need the starter code (ZIP), which should be unpacked to somewhere convenient that you can work on it. The archive contains four files:
mars.occties the simulation together by including various parts of the system together in the right way. You run the simulation by compiling and running this file, rather than any of the others. There's no need to edit this file, and you shouldn't put your code in here, rathermars-main.occ(see below).mars-sim.occcontains the simulator that you see when you run your finished program.mars-robot.incThis file is documented further below, as it contains useful constants andPROTOCOLdefinitions for use on the channels that yourrobot.controlprocess will talk to the operator and robot hardware on.mars-main.occ. This is the file you'll spend your time editing, and eventually submit, as detailed in the submission guidelines. When you receive it, it should contain only a skeletonrobot.controlprocess with the top level channels andSKIPfor a body. Don't be intimidated by the number of channels connected to this process, you'll only need a few to start with.
You'll probably want to have two files open in the jEdit environment at once, the mars-main.occ file to edit and save your actual robot code and the mars.occ file to compile and run the simulator with your code inside.
Note that you won't be able to compile the mars-main.occ file by itself.
Unimplemented Instruction Error
If you are running the 2008.01.16 version of the Transterpreter downloaded from the web, instead of the version you were showed how to install from raptor on the public pc desktop at the start of the term, you might find that you encounter an error similar to the one shown below when you try to run the simulator:
exiting... (unimplemented instruction)
The error occurred on or around line 91 in cordic.occ
mars.tbc exited with error code: 999
If this is the case, you should replace the tvm.exe file in the 'bin' directory of your install with this one: Replacement TVM 2008.01.22. We recommend that you keep your old tvm.exe as tvm.exe.old just in case you encounter a problem - you will need to rename the downloaded file from tvm-2008-01-22.exe to tvm.exe once it's in the right place.
Working with the simulator
By compiling and running the main file (mars.occ) you will execute the simulator.
You'll then be presented with a simulator window that looks something like the one shown below.
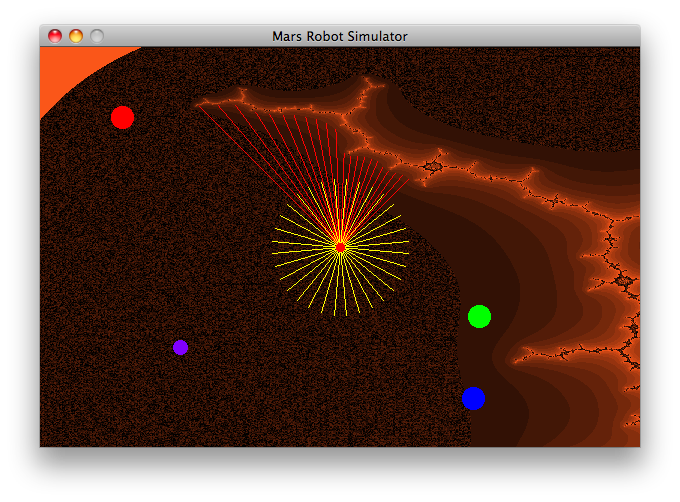
There are four coloured items in the scene (red, blue, green and purple) along with a rocky outcrop (the orangey-brown countoured area). The robot is represented by the red dot, its hazard perception sensors the yellow lines and its forward camera view is shown by the red lines. The rough brown and black textured area represents the martian sand.
The robot.control process
The robot.control process is your piece of occam-pi code that runs to control the robot. In your template, you will notice that only one of the channels given is of a primitive channel type, they all make use of protocols (protocol names in occam-pi begin with P. by convention).
PROC robot.control (CHAN P.OPERATOR.REQUEST   op.req?,
                    CHAN P.OPERATOR.RESPONSE  op.rsp!,
                    CHAN P.CAMERA.DATA        camera?,
                    CHAN P.GRIPPER.CMD        gripper!,
                    []CHAN P.HAZARD.DETECTOR  hazard?,
                    CHAN P.MOTOR.CMD          motor.cmd!,
                    CHAN P.MOTOR.FEEDBACK     motor.feedback?,
                    CHAN BYTE                 log!)
The protocol definitions for each of these channels are declared in the file mars-robot.inc, and you can open that file to skip directly to the detail. The purpose of each channel is as follows:
op.req? (P.OPERATOR.REQUEST)
This is the channel you will receive commands from the human operator on. When you run the simulator you have a text-based entry system to command the robot, which prompts you as shown below:
Please select a command (t)urn, (m)ove, (f)ind blob, (d)eploy sensor:
To allow the robot to act when a command is selected, you have to make your robot.control process interact with the hardware (over the other channels) when it receives the command on the op.req channel.
PROTOCOL P.OPERATOR.REQUEST
  CASE
    turn; INT               -- relative heading (degrees)
    move; INT               -- relative distance (millimeters)
    find.blob; INT          -- colour
    deploy.sensor; INT; INT -- marker colours
:
Each task on your worksheet correlates to one of the variants in this protocol. For each variant you will have to implement some action in the robot and return appropriate responses to the operator.
- Turn to a certain heading (
turn) - Move a certain distance (
move) - Find a blob of a specified colour (
find.blob) - Deploy the sensor between markers of two specified colours (
deploy.sensor)
op.rsp! (P.OPERATOR.RESPONSE)
You will use this channel to report values to the operator (i.e. the console in the simulator). The task sheet explains which variants of this protocol you should return for specific actions. (For example, in the first task you need to return turn.complete with the actual amount turned.)
PROTOCOL P.OPERATOR.RESPONSE
  CASE
    turn.complete; INT      -- approx. amount turned
    move.complete; INT      -- approx. amount moved
    hazard.detected; INT    -- approx. amount moved
    blob.found; INT; BLOB   -- new heading; blob data
    blob.not.found; INT     -- new heading
    sensor.deployed
    drop.zone.not.found
:
You will note that the blob.found variant takes an INT and a BLOB as parameters. You are given a BLOB data structure by the camera when it finds a blob, so you are just required to store and send it on to the operator.
If you complete the fourth task, you will need to augment this protocol further to allow reporting of the robot's relative position, and the reporting of more error conditions.
camera? (P.CAMERA.DATA)
The camera channel will send you data about blobs (that is, coloured objects) that are within the robot's field of view. These blobs are occam-pi records.
PROTOCOL P.CAMERA.DATA IS BLOB:

DATA TYPE BLOB
  RECORD
    INT colour:
    REAL32 bearing:  -- degrees
    REAL32 size:     -- 0 to 1
:
You can access fields within a record by using an subscript syntax, like an array. For example, if I wanted to get the size of a blob found with the camera:
BLOB b:
REAL32 blob.size:
SEQ
    camera ? b
    blob.size := b[size]
You should note the spelling of colour throughout the robot include file and simulator uses the British form, including the u. If you try to use color you will get errors.
gripper! (P.GRIPPER.CMD)
The gripper channel controls a gripper which is holding a sensor probe that is to be dropped on the Martian surface. You will need the gripper channel when you complete task 4 and have navigated to the drop zone for the sensor.
PROTOCOL P.GRIPPER.CMD
  CASE
    deploy
:
You send the deploy protocol variant on the gripper channel to deploy the probe. Note that the gripper has a deployment time (a constant defined in the mars-robot.inc file), and you should wait for this long (the time taken for the gripper to place the probe on the surface) before reporting a success to the operator.
hazard[0-3]? (P.HAZARD.DETECTOR)
The hazard detector is presented to your robot.control process as an array of channels, each being a separate sensor.
There are four hazard detection sensors, with a constant defined for each of their array indexes ([...]). These sensors will send values on a scale from 0-10, with 0 meaning there is no real danger posed and 10 meaning something has hit the robot (bad!). You will receive communications on these channels only when and if the value changes.
motor.cmd! (P.MOTOR.CMD) and motor.feedback? (P.MOTOR.FEEDBACK)
The motor.cmd channel gives you access to the platforms motors. You can pick a drive direction for the motors, or stop them. The robot has two wheels and two motors, with a motor connected to each wheel.
PROTOCOL P.MOTOR.CMD
  CASE
    drive.forward
    drive.backward
    turn.left
    turn.right
    stop
:
Turn left and turn right rotate the robot on the spot (think of a tank turning by running its tracks in opposite directions...) Motor commands continue acting until you send a stop command. When the motors are active, tickers in the motors will send values along the motor feedback channels telling you how much the robot has turned in each step. By integrating these values you can calculate the total amount turned or moved. You can't tell the robot to go forward 60, but you can tell it to go forward, add up all the values for the amounts it moves and stop when that value is 60).
Important: The ticker values are positive when you are going forward and negative when you're going backwards (i.e. you would have an integrated total of 0 if you went forward 20, then backward 20). The same applies for turning, where a right turn will give you positive ticks and a left turn will give you negative ones. You can't (and shouldn't) rely on these ticks being a fixed value anywhere in your code.
log! (BYTE)
This channel provides you with a way to dump debugging output from your robot controller. You should use the standard course module print methods (out.string, out.int etc.) Messages you print are prefixed with an identifier, as shown:
robot 0: Found hazard: x
Tips for Task 1
Turning: You can send
turn.leftorturn.rightcommands to the motors, and then monitor the motor tickers (via themotor.feedbackchannel) to see how far you have turned. You then need to use the stop motor command, and report back your turn distance to the operatormotor.feedbacksends ticks. When you're going right these ticks are positive, when you go left the ticks are negative.The
IABSfunction provided in the include file allows you to discard the sign of anINTand just take the absolute value.A good way to test your turns is to turn 180, then -180 and make sure the robot returns to where it should. Ensure that your robot can turn in both directions successfully.
Tips for Task 2
Hazard detection is important. You should make sure you're safe to move into a space before you move to it (we wouldn't want to lose our very expensive Mars probe). You will have to deal with hazard signals at the same time as motor feedback, you will only receive data from the hazard signals when the level of danger increases on one of the sensors, as described above.
Try moving forward toward the wall until your hazard sensors detect it and stop the robot. Now try to move backward. Can you move? Don't forget that a hazard blocking motion in a specific direction isn't necessarily a hazard to stop the robot if we aren't moving towards it.
Tips for Task 3
The only motion involved in Task 3 is rotation, to ensure that your camera covers the entire area around your robot (as the field of vision of the camera is limited). You should watch for blob data on the camera whilst reading the tick values from the motor. The format of the incoming data is a BLOB record, as described above when dealing with the P.CAMERA.DATA protocol. You should create a variable of type BLOB to read into (an example is shown above).
Again, remember that motors tick positively when turning right and negatively when turning left. The camera has a 2 second scan time, so you might not notice objects immediately as they come into your view. There are at least two approaches to solving this problem, one approach would be to use the camera's field of view (a constant called CAMERA.FOV) to turn intelligently, another might be to look for camera data whilst turning continuously. There are sure to be other ways.
Tips for Task 4
You're on your own here (for now, at least) Apply what you've learned by completing the first three tasks, and consider that you may be able to re-use pieces of earlier solutions to help solve the problem.
Resources
The occam-pi reference is an extremely useful resource when you're trying to remember syntax or operators. The CO538 Moodle Page has a comprehensive list of resources including the lecture slides, papers, example programs and library documentation.
Problems?
If you have problems that are not covered here, or something isn't clear, feel free to e-mail me: J.Simpson@kent.ac.uk and I will attempt to get back to you as soon as possible, as well as updating this page if appropriate.
Failing that, you can use the CO631 anonymous question page (submit new question, answers tagged mars - links require internal access/chain login) to see if questions have been asked there. You can also ask questions in your weekly seminars. Finally, you could check back at this page in a few days as I am updating it with questions and clarifications whenever appropriate from e-mailed feedback.
This assignment is challenging and has a lot of room for you to find your own way to solve the problems, so you should experiment, explore your ideas and try to think the problem out away from the keyboard.